
Tools and Supplies:
Xyron 5in Create-a-Sticker
Xyron 1.5in Sticker
Tape Glider
Eyelet Applicator
2 – 5-1/2”x8-1/2” Cardstock (used for front & back cover)
5-1/2”x8-1/2” Scrap paper (used for inside sheets)
5”x8” Cardstock (used for background)
4”x6-1/4” Decorative Cardstock
1”x8-1/2” Decorative Strip
3-3/4”x1-3/4” Decorative Cardstock (used for a background name tag)
1-1/2”x5” Cardstock (used for penholder)
1/2”x2-1/4” Decorative Strip (used for front of pen holder)
8-1/2” Yarn
3-6” Yarn
6- Eyelets

Step 1. Adhere the background to cover. Take the 5”x8” cardstock and run it through the Xyron 5in Create-a-Sticker. Carefully place on the 5-1/2”x8-1/2” Cardstock, leaving a 1/4” border around all edges.


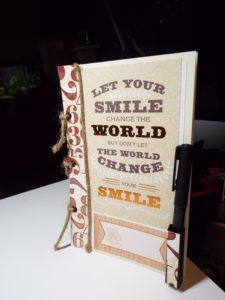
Step 2. Create the front cover decorations. Take the 4”x6-1/4” decorative cardstock, 1”x8-1/2” decorative strip, 3-3/4”x1-3/4” decorative cardstock, 1/2”x2-1/4” decorative strip and run all of them through the Xyron 5in Create-a-Sticker. Apply to front cover as shown to create a layering effect.


Step 3. Create the penholder. Take the 1-1/2”x5” Cardstock and score on the long sides a 1/2” from edge. Cut a 1/2” square at 2-1/4” from edge of short side. Fold at score lines. On the opposite side, apply the 1/2”x2-1/4” decorative strip to the front of the penholder. Run the tape glider on one set of tabs and assemble the penholder. Run the tape glider to the backside of the penholder and place on the front cover.


Step 4. Add texture to the front. Take the 8-1/2” Yarn and run through the Xyron 1.5in Sticker. Jute was used in tutorial and worked really well. Apply yarn to front cover.


Step 5. Assemble journal. Line up the decorative cover, several sheets (8 were used in the tutorial) of 5-1/2”x8-1/2” Scrap paper, and 5-1/2”x8-1/2” cardstock (back cover). Use the hole punch from the eyelet applicator and punch holes at 2” from the edge and centered between the two. Apply eyelets to front and back cover only. Line up the journal and use the 6” yarn to tie. Add your pen. The journal is complete.


